Canadian iPhone Plans released today

Rogers released their Voice and Data Plans for the iPhone today and I have to say they are not impressive. As usual Cell Phone companies in Canada are showing that they are not being competitive with the rest of the world!

Here is the table for the Rogers web site:

Monthly Fee $60 $75 $100 $115
Weekday Minutes Included 150 300 600 800
Evenings and Weekend Evenings are from 9 p.m to 7 a.m Monday to Friday and Weekends are from 9 p.m Friday to 7a.m Monday unlimited unlimited unlimited unlimited
Data Included
1MB= 1,024 KB 1GB=1,024MB
400MB 750MB 1GB 2GB
Bonus Sent Text Messages 75 100 200 300
Visual Voicemail – New with iPhone
Visual Voicemail allows you to go directly to any of your messages without listening to the prior messages, so you can quickly select the messages that are most important to you.
Included Included Included Included
Access to Rogers Wireless
and Fido Hotspots
Unlimited Unlimited Unlimited Unlimited
Additional Weekday Minutes
(per minute)
35¢ 35¢ 25¢ 15¢
         

Additional Data
50¢ per MB for the first 60 MB, 3¢ per MB thereafter

Additional Sent Text Messages
(per message)

15¢

Hmm No unlimited Data Plan here as per the US (40.00 per month data only)

If you plan on using the iPhone to do a lot of surfing on the web I think you will be in for a nasty surprise using the 3G connection. 2GB of download data can be burned up very quickly, and if you syncing to an exchange server and getting attachments it will not take very long to burn through the download limit.

The iPhone release is not having the affect that I hoped it would in lowering the price of data transfers on the cellular network here in Canada. While I think the plans are not bad they are overpriced and again I am looking at my Blackberry and looking at keeping it.

In addition they are offering iPhone essentials where for a 15 or 20 dollars more per month you can have more text messages, Call display and forwarding minutes. Looks like Call display is not even included in the main packages.

On another note I heard that the Blackberry Bold will not be available till Mid August now.

If I decided to get the iPhone (although looking at this I will probably not), the only package that would really suit me would the 100 or 115 dollar ones.


Smugmug vs. Flickr

If you have read some of my earlier posts you will know that I use 2 sites as my primaries for displaying my photos. I have had my Flickr Pro (www.flickr.com) account for about 3/4 of a year, and I have had my Smugmug Poweruser Account (www.smugmug.com or my site www.sysguyphotography.com) for about a month now. I also have a Picasaweb site and I use Gallery 2 software on my own site for pictures but I am moving away from those. This is just a quick comparison of the two services and what I have found out.

Accounts

Flickr offers both free and paid accounts. Free accounts are limited to 100MB per month upload but unlimited storage. Free accounts are also ad supported. For 25.00 you can get a Pro account and removes the upload limit, allows for short video uploads and is ad free.
Smugmug. There are no free accounts on Smugmug but they do have a 14 day free trial. Lowest tiered paid accounts are 39.95 USD per year and with that there are no ads, unlimited storage and uploads. Smugmug also offers Power User and Pro accounts (59.95 USD and 149.95 USD). They also have a referral program so that you can save 5.00 off your first year using a coupon or email address from a Smugmug user and they also have a special “Fleeing Flickr” promotion where you can save 50% off of their first year. Other features that come with the higher level accounts include the ability to use your own domain, right click download protection

Both services offer stats regarding your sites and what photos are being most viewed.

Photo Organization

This is how you sort and organize your photos on the various sites. With Flickr you can add your photos to sets and or collections. Collections can contain sets in them. Pro users can have more collections than standard users.

Smugmug uses Galleries to display your photos. Galleries are created under Categories and Sub categories. You can choose from their own default categories and sub categories or create your own. While I found this a little confusing at first, I have figured out the system and can now know what I am doing.

With both systems you can add your own tags to photos to make them searchable and easier to find. Also photos tagged with GPS coordinates can be viewed on maps with both services.

Both services offer uploader software to get your pictures on your site, both their own and third party applications. I have been using several free Lightroom plug-ins that allow me to export directly out of Lightroom into my various galleries and collections. Both sites have the ability to upload photos via email but Flickr does have a mobile site to upload to directly from your phone and it’s web browser.

Privacy and Viewing Permissions

Both services allow you to protect your photos if you don’t want them seen. This is important as you may want not want to display your images to the entire world. For example if I am publishing the shots I took of a minor soccer game for the parents to see and print, I want to protect those images from other prying eyes.

On Flickr, privacy settings for photos are a global default setting and are applied to the images themselves. You can set them as public, or private (sharing with Family, Friends or no one). You can easily add Copyright or Creative Commons usage rights with just a click to your photos.

Smugmug offers a lot more control at the Gallery level for your Privacy. You can create “SmugIslands”  Permissions are set based on two categories and are granular from there. There is a Hello World Setting meaning anyone can see the Gallery (including search engines like Google) and you can set it to all, only your homepage or no. The other setting is Hello Smuggers which allows for your photos to be searchable from within Smugmug search boxes. You can also do other things at the gallery level including creating unlisted galleries (that unless you have the exact URL you can’t find, you can password protect a gallery or you can do both. As the owner you can see all of your galleries all the time. Power users can also Right Click protect their images and Pro users can add mark ups to print prices and sell digital downloads of the images.

Viewing Experience

This is one of the things that I really look at. What is the experience for the people viewing your pictures. Your Flickr Homepage has limited options for customization. There are a few options for layouts but for the most part all of your images but you really can’t do a lot of customization to your site.

Smugmug really shines here. Not only can you (or allow your viewers) to change the layout of your gallery, but you can customize the themes and the page itself. Power and Pro users can replace the headers and footers of the page. When a viewer gets to your gallery page they can see the thumbnails of the photos in the gallery and when they click on it a larger image of the image is shown. This display is stetchy so if your visitor is viewing from a large widescreen monitor their picture will be the largest it can be. The display actually scales nicely on all of the different screens I have tried form 12.1″ to 24″.

Both services offer a slideshow display that is basically the same.

Content

One of the things I like to do is to browse other photos that users have uploaded. I like to see good photographs just to enjoy or to get some tips on taking some pictures. I have also used these type of sites to download pictures for use in kids school projects (and yes I only use images that are allow this type of use). One of things that I have found is that since there are no free accounts on Smugmug and because there are a lot of Professional Photographers there, the quality of the images seem to be better. There are some outstanding photos on Flickr there also tends to be a lot more in the way of family snapshots etc so it makes them a little harder to find. One way of finding great shots though is via the groups on Flickr.

While Smugmug has a similar thing to Flickr’s groups (called communities) the social and community aspect of Flickr is much better. To be fair I haven’t played around with the Smugmug Communities all that much yet, but I still find myself going to the Flickr groups on a regular basis.

One of the nicest features of the groups on Flickr are the discussion boards where you can read and ask questions of other members with the same likes and dislikes. I have found some very good tips and tricks in the groups forums. There are groups for just about everything including; camera types, lenses, locations, subjects etc.

My Conclusions

While I really like both sites a lot, I think the edge has to go to Smugmug. While they lack the community aspect of Flickr, the visual presentation of your photos, the customization and the extra features really make it worth while. Will I give up my Flickr account? No I will renew it, I will still use it to share photos, participate in groups and post my photos to the various groups. When I have images that I would like to protect they will all be uploaded to my Smugmug site. If I decide I want to sell some of my photos, I will probably upgrade to a Smugmug Pro account. Smugmug just added a new feature to their site called SmugVault. If you are interested in finding out what this is please read my previous post.

 

Cool new Smugmug feature

This past weekend the photo sharing website rolled out a cool new feature. They have partnered with Amazon S3 to offer a new SmugVault feature.

So what is SmugVault? SmugVault is an interface built into the Smugmug site that allows you to back up your photos (and all types of documents) to servers located in Amazon Data Centres around the world. This is a great way to have offsite backups of your photos and important documents.

The cost of the service is not free however it is not that expensive. There is a 1.00 USD per month charge and then charges based on your usage. It costs .22 cents per Gigabyte per month to store your data on Amazons servers. There is also bandwidth charges of .30 per GB to transfer into Amazon and .50 per GB to download from Amazon.

Your data is accessible from any browser that you can access your Smugmug account from. If you think of the cost of these services vs. doing the backup yourself there can be considerable savings. An external drive can cost about 100.00 – 120.00 for 500 GB. In addition you have to maintain it and pay for power to keep it running. If you fill that you have to buy another drive. If you want to do offsite storage with it you have to take it somewhere safe and store it. Your cost for the storage itself is about .20 per GB as a one time charge until the drive fills up. In addition if you are away form home you can’t access your documents unless you have set up a method of accessing your home computer. Although we recommend that you store important documents in at least two places  for backup purposes (Computer and external Hard Drive).

For a little more you can have your data stored in secure data centres which protects it in case of catastrophe at your home.

Anyone can sign up to use the Amazon S3 service at a cheaper rate however you have to design your own interface to the service. There are other ways of getting the services cheaper via other offerings. Personally I use Jungledisk (http://www.jungledisk.com) to interface with S3. Please watch here for a review of the Jungledisk service in the next little while.

If you are looking for a great Photo sharing service with excellent service and offerings I can’t stress enough to look at smugmug! You can save 5.00 off your first years membership by putting my coupon code (UgaKIvXVMo0Y) in the referred by box when signing up. If you want to see some of my photos at Smugmug visit, http://www.sysguyphotography.com

Great Browser add on. PicLens

I have found a great browser plug in that works with both Internet Explorer, Safari and Firefox 2 and Firefox 3 Release Candidates. The plug in is designed to work with Photo sites and video sites like Youtube, Flickr, Picasa. Facebook etc.

When you get to a page that has images or videos you can either click on the Piclens icon on the photo or video, or on the Piclens icon on your browser bar. The images open up in a smaller format on a 3D wall that you can quickly scroll through, click on individual pictures and see the larger image. It virtually turns the site into a  3D slideshow of images.

I browse a lot of Photosites like Flickr and Smugmug and I love using Piclens to go through the photos.

I highly recommend this plug in for anyone that does visit a lot of Photo or Video sites on the web.

You can download Piclens here. http://www.piclens.com. Oh yeah and I forgot to mention the best part, it is free to use.


No Zune Marketplace option in Canadian Zune Software. Link to Fix included!

With the Canadian release of the Zune today, I installed the Zune softwre on one of my PC’s that didn’t have it. The software looks the same as the other versions I have except that there is no option for the Zune Marketplace. While this is not a big deal as you can’t buy music outside the US and without a US credit card, you can’t download free podcasts either.

I signed in with both my US based Zune account and my Canadian Xbox live account and still could not see the Marketplace option.

I Googled it and it looks like there is a fix that is pretty easy. Just follow the instructions on this site.

Enable Zune Marketplace in Canada

It is a very simple fix and I can confirm that it works. I can subscribe to podcasts via the Marketplace even signed in with my Canadian XBox Live account.

Otherwise the software seems to work fine.

Response Point Demo Kit here! Full review coming soon!

Yesterday our Response Point, Syspine Demo kit arrived. Microsoft Response Point is a hardware/software phone system for small businesses. The system is very low cost compared to some vendors system out there and it adds easy administration and changes.

Not sure if this system has the Response Point Service Pack 1 Beta installed on it, but we will be testing whatever version we have and learning it. We should soon be able to offer demos to clients that are looking into replacing a phone system.


Live Mesh Tech Preview – First Impressions

My request to join the Microsoft Live Mesh Technology Preview program (http://www.mesh.com) was accepted today and I have just finished installing on a couple of PCs to test it out. Live Mesh is a service that will allow you to synchronize files and folder to a central location that you can share between your PCs as well as giving you the ability to remotely access your devices. You can do many of the things that Live Mesh does right now (also for free) using a variety of technologies, however this puts all of it in one place and one simple application. Currently Mesh only supports Windows based PCs but in the future it will have MAC and mobile device support.

When you first log on to Mesh using your Windows Live ID, you see your Live Desktop (with 5 GB of space) as well as devices and the option to add a device. The first step is to add a device (currently only Vista and XP PCs). You download and install the client software (less than 2Mb) then add your Live ID and password. After the software installation has completed you then see the PC as a device in the Mesh. Once your PC shows up in the Mesh you can add folders to synchronize to the Live Desktop simply by going to explorer, right clicking and selecting "add folder to your Live Mesh". The folder will now appear in your Live Mesh Live desktop and you can access it via the web.

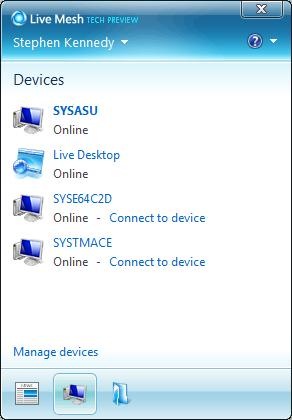
Live Mesh notifYou don’t have to directly access the Live Mesh website to see your devices and desktop either. When installed a piece of software that runs in your system tray called the notifier allows you to see devices, recently added folders and to connect to devices. If you click on Live Desktop it will open the Live Mesh website. From here you also select the folders that you would like to synchronize with the PC.

If you have more than one computer and you install Mesh on each PC you can synchronize the folders between PCs. After adding a folder to your Live desktop from one PC, you go into the notifier (system tray application), select manage folders and then select the folder to sync somewhere to your PC. Adding something to this desktop synchronizes it down to the other PC.

Remote Desktop. Also from your Mesh home page you can remotely connect to any devices that have been added, allowing you to drag and drop files between PCs or work the desktop like you are sitting in front of it. I on my Vista Ultimate and XP Pro systems this works fine. I wanted to test it on my wife’s Vista Home Premium laptop but I have been having software issues trying to get it installed on there. XP Home and Vista Home Premium and lower  have remote access built in but it is disabled. Right now I can’t say that this will give it remote access. Windows Home Server does not give this access to XP Home or Vista Home Premium. I have read reports though that Live Mesh does in fact allow Remote Desktop to XP Home and Vista Home Premium machines. Does Microsoft now realize that this is becoming a needed feature for home users too. This is something that I suggested being added to Windows Home Server when I was in the beta program.

Alternatives. As I stated earlier you can accomplish this with several technologies now that are either free or at a low cost. Using the free service at www.logmein.com you can install the client on your PC and connect to your PC from any web browser in the world (including Firefox). Logmein also works on Macs right now. If you have a Windows Home Server you can also access files that are stored there via a web browser and remote control desktops running Windows Vista Business or better or Windows XP pro. Logmein also works with XP Home and Vista Home Premium.

foldershare As for sharing files and folders, that can also be accomplished with another free Microsoft Application that also works on MACS. http://www.foldershare.com is a small application that you can download on to your PC or Mac and share files from any connected PC or via a website. I believe that the Foldershare technology is built in to Live Mesh, but unless you sync the folders to your Live Desktop or connect via remote desktop you don’t have access to them. I chalk this up as a strength of Foldershare. See a screen capture of my Foldershare site on the left.

If you want an online storage folder with the ability to share drives, you can use Microsoft Live Skydrive http://skydrive.live.com. Again this is a free service that allows you to store up to 5 GB of files on the web, maintaining private access or sharing with friends or everyone.

You can also do most of what Live Mesh offers if you have a Windows Home Server. You can add file sharing for all PCs and remote desktop (for XP Pro or Vista Business or better). However Vista home server also has add-on capability so you can add a lot more functionality to your home server (off site backup, photo galleries etc) in addition to expandable storage and data protection.

Conclusion. The idea of Mesh is not new at all. As I ave written you can do all of these things now except that you need other applications. There will be more functionality once you can install the software on Macs and mobile devices. It will be interesting to see if you will be able to remote control a Mac using the application but somehow I don’t think that this i possible. If you have multiple PCs and are mobile with a laptop, Live Mesh may be something that you are interested in.


Zunes available in Canada Tomorrow, June 13th 2008.

I was in my local Wal-Mart the other day and I noticed that they have their MP3 case set up with some demo Zunes. The Zune goes on sale in Canada tomorrow June 13th. Unfortunately the Zune marketplace (store) will not yet be available but that is soon. I will be testing a Canadian installation of the Zune software tomorrow. As of right now I have my accounts set up as US accounts.

I currently have 2 Zunes, both an 80 GB and an 8 GB. I have written a review of the 80GB on this blog here. Version 2.5 of the Zune software and the firmware have fixed a few of the little irritants I had (especially separating Video and Audio podcasts) but have also added one more irritant and that when playing a podcast if you have play one podcast episode and also have earlier unlistened to (or unwatched ones) it will automatically play those.

All in all, I still really like my Zunes and will keep them. There has been a confirmation that the devices will soon add Audible audio book support which will make an excellent device even better!

If you are looking to an alternative to an iPod, I highly recommend the Zunes.

iPhone 3G in Canada July 11th?

Well the Steve note at Apple’s WWDC just ended and to no ones surprise the new 3G iPhone was announced. Job’s indicated that the new iPhone would be released in 22 countries on July 11th. In Job’s map in the keynote Canada was coloured red indicating that Canada had (or would get) the iPhone.

The new iPhone is lower priced, 199.00 (Black) for the 8GB and 299.00 for the 16GB (available in white), features include Microsoft Exchange support, VPN support, a flush headphone jack, better audio, GPS and better battery life. As well it will work on Rogers HSDPA network in major centres for high speed browsing.

Several other products we announced at WWDC today. Applications for the iPhone and the new App store on iTunes, Mobileme which will replace .mac as a new way to sync your data between computers and your iPhone.

No word yet form Rogers (at least on their press release site) as to the availability and pricing of the plans, but if they are joining the July 11th release date expect to see something really soon.

New applications will be available for older iPhones free and for iPod Touch owners for 9.99.

I am up in the air about this new iPhone and I am not sure I want to give up my Blackberry Curve just yet. I have been awaiting the announcement from Rogers of the new Blackberry Bold and maybe the Thunder. I ave an iPod Touch with the iPhone applications and while I like the WIFI browsing experience I am not sure if I am a big fan of the on screen keyboard. I have to correct loads of my own spelling mistakes as I have fat fingers and I find it is a little tricky to type on the keyboard.

Update: Just checked the Apple.ca website and they do indicate that the 3G iPhone will be coming to Canada July 11th. No release on Roger’s website yet though.


You may now buy an Apple TV!

Yesterday the Canadian iTunes store added movies (for purchase or rental) to their offerings bringing us a step closer to getting what our friends south of the border have. However the TV show offerings still leave a lot to be desired, unless you want to watch Canadian shows.

By adding movies to the store for download, it now makes sense for Canadians to buy an Apple TV.  Apple TV is a box that connects to your TV and allows users to rent and buy movies, TV shows and video podcasts from the iTunes store and watch them on their big screen TV. The box can also stream video and audio content from your PCs or Macs via iTunes to the Apple TV. The original (although with version 2 software and 40 GB hard drive sells for 249.00 CDN and a 160GB version that sells for 349.99.

The Apple TV has been available for a while in Canada but without the movies on the iTunes store it wasn’t really worth purchasing.

Most of the movies available are in standard definition but if you have an Apple TV only you can rent HD movies. Movies sell for roughly the same as a DVD in stores (in some cases a little more) 14.99 to 9.99 however I have seen some movies for 19.99. Rentals cost 4.99 and you have 30 days from the time of rental to watch and 48 hours after you have started watching to finish it. After these times expiry the movie will disappear.

As with most other iTunes products you can transfer purchased content to up to 5 PCs or Macs. Purchased movies can be burned to DVD (or copied to an external drive) for backup purposes but not for watching (basically you are burning a data DVD). Purchased and rented movies can be transferred to an iPod to take with you when you head out. 

Movies can take from 20 minutes to 3 hours to download to your PC depending on the speed of your Internet connection. You can start watching once enough of the movie has been downloaded.

From what I understand video quality is not bad and the HD rentals are slightly lower quality than an HD DVD or Blu-Ray Movie.

Personally I do find the idea intriguing. I still like the idea of purchasing a movie on a DVD disk to get all of the extras on the disks as well as the portability of the disk. I can take a purchased DVD disk over to my parents place with me, not so for the downloaded movies. As for selection of movies it does not look too bad but it is limited. As I have stated as for TV shows there is not much available and if you are looking for US network shows, forget about it on the Canadian store.

One thing to note. I have heard that the Apple TV does get extremely hot to the touch. There is no fan in the system to keep it cool so it uses the case as a large heat sync. Be careful not to leave items sitting on top of it.

I might try out renting a movie by connecting my MacBook Pro to my HD TV and downloading one just to see what happens. If I do so I will post my results here and let you know what it looks like.