Live Mesh Tech Preview – First Impressions

My request to join the Microsoft Live Mesh Technology Preview program (http://www.mesh.com) was accepted today and I have just finished installing on a couple of PCs to test it out. Live Mesh is a service that will allow you to synchronize files and folder to a central location that you can share between your PCs as well as giving you the ability to remotely access your devices. You can do many of the things that Live Mesh does right now (also for free) using a variety of technologies, however this puts all of it in one place and one simple application. Currently Mesh only supports Windows based PCs but in the future it will have MAC and mobile device support.

When you first log on to Mesh using your Windows Live ID, you see your Live Desktop (with 5 GB of space) as well as devices and the option to add a device. The first step is to add a device (currently only Vista and XP PCs). You download and install the client software (less than 2Mb) then add your Live ID and password. After the software installation has completed you then see the PC as a device in the Mesh. Once your PC shows up in the Mesh you can add folders to synchronize to the Live Desktop simply by going to explorer, right clicking and selecting "add folder to your Live Mesh". The folder will now appear in your Live Mesh Live desktop and you can access it via the web.

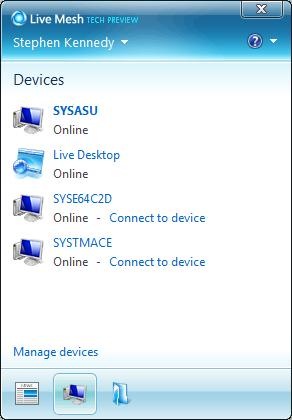
Live Mesh notifYou don’t have to directly access the Live Mesh website to see your devices and desktop either. When installed a piece of software that runs in your system tray called the notifier allows you to see devices, recently added folders and to connect to devices. If you click on Live Desktop it will open the Live Mesh website. From here you also select the folders that you would like to synchronize with the PC.

If you have more than one computer and you install Mesh on each PC you can synchronize the folders between PCs. After adding a folder to your Live desktop from one PC, you go into the notifier (system tray application), select manage folders and then select the folder to sync somewhere to your PC. Adding something to this desktop synchronizes it down to the other PC.

Remote Desktop. Also from your Mesh home page you can remotely connect to any devices that have been added, allowing you to drag and drop files between PCs or work the desktop like you are sitting in front of it. I on my Vista Ultimate and XP Pro systems this works fine. I wanted to test it on my wife’s Vista Home Premium laptop but I have been having software issues trying to get it installed on there. XP Home and Vista Home Premium and lower  have remote access built in but it is disabled. Right now I can’t say that this will give it remote access. Windows Home Server does not give this access to XP Home or Vista Home Premium. I have read reports though that Live Mesh does in fact allow Remote Desktop to XP Home and Vista Home Premium machines. Does Microsoft now realize that this is becoming a needed feature for home users too. This is something that I suggested being added to Windows Home Server when I was in the beta program.

Alternatives. As I stated earlier you can accomplish this with several technologies now that are either free or at a low cost. Using the free service at www.logmein.com you can install the client on your PC and connect to your PC from any web browser in the world (including Firefox). Logmein also works on Macs right now. If you have a Windows Home Server you can also access files that are stored there via a web browser and remote control desktops running Windows Vista Business or better or Windows XP pro. Logmein also works with XP Home and Vista Home Premium.

foldershare As for sharing files and folders, that can also be accomplished with another free Microsoft Application that also works on MACS. http://www.foldershare.com is a small application that you can download on to your PC or Mac and share files from any connected PC or via a website. I believe that the Foldershare technology is built in to Live Mesh, but unless you sync the folders to your Live Desktop or connect via remote desktop you don’t have access to them. I chalk this up as a strength of Foldershare. See a screen capture of my Foldershare site on the left.
If you want an online storage folder with the ability to share drives, you can use Microsoft Live Skydrive http://skydrive.live.com. Again this is a free service that allows you to store up to 5 GB of files on the web, maintaining private access or sharing with friends or everyone.

You can also do most of what Live Mesh offers if you have a Windows Home Server. You can add file sharing for all PCs and remote desktop (for XP Pro or Vista Business or better). However Vista home server also has add-on capability so you can add a lot more functionality to your home server (off site backup, photo galleries etc) in addition to expandable storage and data protection.

Conclusion. The idea of Mesh is not new at all. As I ave written you can do all of these things now except that you need other applications. There will be more functionality once you can install the software on Macs and mobile devices. It will be interesting to see if you will be able to remote control a Mac using the application but somehow I don’t think that this i possible. If you have multiple PCs and are mobile with a laptop, Live Mesh may be something that you are interested in.


Zunes available in Canada Tomorrow, June 13th 2008.

I was in my local Wal-Mart the other day and I noticed that they have their MP3 case set up with some demo Zunes. The Zune goes on sale in Canada tomorrow June 13th. Unfortunately the Zune marketplace (store) will not yet be available but that is soon. I will be testing a Canadian installation of the Zune software tomorrow. As of right now I have my accounts set up as US accounts.

I currently have 2 Zunes, both an 80 GB and an 8 GB. I have written a review of the 80GB on this blog here. Version 2.5 of the Zune software and the firmware have fixed a few of the little irritants I had (especially separating Video and Audio podcasts) but have also added one more irritant and that when playing a podcast if you have play one podcast episode and also have earlier unlistened to (or unwatched ones) it will automatically play those.

All in all, I still really like my Zunes and will keep them. There has been a confirmation that the devices will soon add Audible audio book support which will make an excellent device even better!

If you are looking to an alternative to an iPod, I highly recommend the Zunes.

iPhone 3G in Canada July 11th?

Well the Steve note at Apple’s WWDC just ended and to no ones surprise the new 3G iPhone was announced. Job’s indicated that the new iPhone would be released in 22 countries on July 11th. In Job’s map in the keynote Canada was coloured red indicating that Canada had (or would get) the iPhone.

The new iPhone is lower priced, 199.00 (Black) for the 8GB and 299.00 for the 16GB (available in white), features include Microsoft Exchange support, VPN support, a flush headphone jack, better audio, GPS and better battery life. As well it will work on Rogers HSDPA network in major centres for high speed browsing.

Several other products we announced at WWDC today. Applications for the iPhone and the new App store on iTunes, Mobileme which will replace .mac as a new way to sync your data between computers and your iPhone.

No word yet form Rogers (at least on their press release site) as to the availability and pricing of the plans, but if they are joining the July 11th release date expect to see something really soon.

New applications will be available for older iPhones free and for iPod Touch owners for 9.99.

I am up in the air about this new iPhone and I am not sure I want to give up my Blackberry Curve just yet. I have been awaiting the announcement from Rogers of the new Blackberry Bold and maybe the Thunder. I ave an iPod Touch with the iPhone applications and while I like the WIFI browsing experience I am not sure if I am a big fan of the on screen keyboard. I have to correct loads of my own spelling mistakes as I have fat fingers and I find it is a little tricky to type on the keyboard.

Update: Just checked the Apple.ca website and they do indicate that the 3G iPhone will be coming to Canada July 11th. No release on Roger’s website yet though.


You may now buy an Apple TV!

Yesterday the Canadian iTunes store added movies (for purchase or rental) to their offerings bringing us a step closer to getting what our friends south of the border have. However the TV show offerings still leave a lot to be desired, unless you want to watch Canadian shows.

By adding movies to the store for download, it now makes sense for Canadians to buy an Apple TV.  Apple TV is a box that connects to your TV and allows users to rent and buy movies, TV shows and video podcasts from the iTunes store and watch them on their big screen TV. The box can also stream video and audio content from your PCs or Macs via iTunes to the Apple TV. The original (although with version 2 software and 40 GB hard drive sells for 249.00 CDN and a 160GB version that sells for 349.99.

The Apple TV has been available for a while in Canada but without the movies on the iTunes store it wasn’t really worth purchasing.

Most of the movies available are in standard definition but if you have an Apple TV only you can rent HD movies. Movies sell for roughly the same as a DVD in stores (in some cases a little more) 14.99 to 9.99 however I have seen some movies for 19.99. Rentals cost 4.99 and you have 30 days from the time of rental to watch and 48 hours after you have started watching to finish it. After these times expiry the movie will disappear.

As with most other iTunes products you can transfer purchased content to up to 5 PCs or Macs. Purchased movies can be burned to DVD (or copied to an external drive) for backup purposes but not for watching (basically you are burning a data DVD). Purchased and rented movies can be transferred to an iPod to take with you when you head out. 

Movies can take from 20 minutes to 3 hours to download to your PC depending on the speed of your Internet connection. You can start watching once enough of the movie has been downloaded.

From what I understand video quality is not bad and the HD rentals are slightly lower quality than an HD DVD or Blu-Ray Movie.

Personally I do find the idea intriguing. I still like the idea of purchasing a movie on a DVD disk to get all of the extras on the disks as well as the portability of the disk. I can take a purchased DVD disk over to my parents place with me, not so for the downloaded movies. As for selection of movies it does not look too bad but it is limited. As I have stated as for TV shows there is not much available and if you are looking for US network shows, forget about it on the Canadian store.

One thing to note. I have heard that the Apple TV does get extremely hot to the touch. There is no fan in the system to keep it cool so it uses the case as a large heat sync. Be careful not to leave items sitting on top of it.

I might try out renting a movie by connecting my MacBook Pro to my HD TV and downloading one just to see what happens. If I do so I will post my results here and let you know what it looks like.


Smugmug vs Flickr

Since joining Smugmug a little while ago, I have spent a considerable amount of time looking at published photos both on Flickr and Smugmug. I have to say that I am very impressed with the members of Smugmug. Browsing the days popular photos always amazes me with some of the talent that is there. There are some stunning images being published there.

I find that while Flickr has a large number of outstanding photos as well, it is a little more difficult to sort through all of the cell phone pics etc.

Check out both

Smugmug http://www.smugmug.com/browse/

Flickr http://www.flickr.com/photos/


Can’t find Wii Fit? Go to Europe!

I just lucked out and followed up on a gut feeling and got the last copy of Wii Fit from my local EB Games. I didn’t bother pre ordering because I figured it was a game and would be fairly easy to get. Boy was I wrong!

I heard an interesting story yesterday regarding the availabilty of the Wii and Wii Fit. Apparently Nintendo has allotted more units to Europe due to the weakness of the US dollar and the strength of the Euro. While it may not seem fair, if I were a Nintendo shareholder that is exactly what I would want. Sell more units were the profit margins are higher.

If you want a Wii Fit about all you can do right now is go to the store when they expect their shipments and hope that they come in while your there! Good Luck.


Adobe Photoshop Lightroom…My Review

About a year ago, Jan 07, Adobe introduced a product called Photoshop Lightroom. The program was billed as a Photographer’s workflow tool designed by photographers for photographers. I looked at it briefly but didn’t really pay too much attention to it.

Fast forward to December of 2007 and I was browsing the Photoshop site at Adobe for something, when I started watching a flash promo for Lightroom. The little promo film intrigued me and I thought that this program was definitely something that I could use to manage my pictures. I downloaded the 30 day demo onto my MacBook Pro and started playing with it (Don’t worry it is available on Windows too). Within an hour and a half of playing with it I was sold and ordered the full version and I couldn’t be happier.

There are programs that I like to use, but rarely has a piece of software caught my attention so much that I wanted to use it all of the time! Lightroom has become one of them.

Is it for everyone? No. But if you take a lot of digital photos, have the need to tag and organize these and want to do some processing it could help you. If you have a need for a lot of specialized post processing, it will not replace a Photoshop or dedicated image editor. It’s strengths really are for workflow and quick processing on lots of pictures. It is not the cheapest software out there either at 325.00, but it is half the cost of Photoshop. In comparison Apple sells Aperture which is a similar application for 199.00 but only runs on Macs.

What is it?

How can I describe Lightroom? Lightroom is an application that helps anyone with a large number of digital photos to organize them, tag them and perform some post processing on the photos. The best thing about the application though is that the changes you make are non destructive to the original photos until you decide to "bake" them in! In terms of the photo processing, if you have ever used any applications that utilize Adobe Camera Raw, or Canon’s Digital Photo Professional, you will have seen some of the power of Lightroom. I have heard Lightroom described as Camera Raw on steroids. Another really nice feature is that the changes also work on all image files and not just RAW formats, so you can make changes to your jpg files and tif files too.

In addition Lightroom can export your photos and your changes to files, the web, slideshows or prints. It is when you perform these exports that the changes are "baked in" to the exported files. In addition with version 1.3 that was released as a free upgrade in November, developers can now create plugins to expand the use of the software. I currently use 5 export plug-ins that allow me to export directly to my Flickr, Picasa, Smugmug or Gallery 2.0 online photo galleries. I also use the LRMogrify which allows for some editing colour correction as well as add Watermarks to the files during export. I have donated to the author so I now have the full version that allows me to export more than 10 photos at a time.

How it Works.

When you open Lightroom for the first time, it asks you to create a catalogue file. This catalogue file is database file that stores the meta data from your pictures as well a corresponding preview database is also created. The database file can be created anywhere on your system or external devices with the exclusion of network storage devices. Once the Lightroom catalogue file is created you can import photos into it from your computer or directly from your digital camera or other media.

Here is a tip on how I have been handling my catalogue files. When I travel I download all of my pictures onto whatever laptop I have with me as well as on to a removable hard drive at the same time. When I want to import photos into Lightroom I create the catalogue files on the removable hard drive device and import those pictures into Lightroom, selecting import from folder. Doing it this way allows me to plug the external drive into another system that has Lightroom installed on it, open the catalogue and edit the pictures regardless of what machine the files were created on. It allows me to work on my various laptops or on my desktop. In addition I could always copy the folders and catalogue files to another storage device later and keep all of my adjustments. 

I have not imported a lot of files into the same catalogue file yet either as I am not sure how performance would be or what the max size of the database is. By keeping my catalogues to all of the photos of a single trip or event, then I am using smaller catalogue files and making them easier to move around. Also if a database does get corrupted not all of my adjustments are in the one file. It does make a little trickier to search photos though as I have to open catalogue files for each group of photos that I may want to search keywords on. Lightroom does have the ability to back up and create scheduled back ups of your catalogue files as well and you are prompted when you start Lightroom with a catalogue file.

Lightroom is divided into 5 modules, Library, Develop, Slideshow, Print and Web.

Library.  The Library module is where you can view your pictures, edit metadata (keywords copyright info), make picks as to what photos you want to process and rate your photos. You can even apply some quick development settings. You can search for keywords in your photos, sort by camera, date or even lens used to take the picture.

Develop. The Develop module is where the real power of Lightroom is. Here there are a number of settings where you can tweak and adjust your image. What is very important to note here is that any changes that you make here do not affect the original images. The editing process is completely non-destructive. All changes are stored in the database itself and not "baked" into the image until the image is exported or printed. You can also crop photos (again non destructively) heal spots and fix red eye. You can adjust White Balance (more options if you shoot RAW images), tone, tweak a tone curve, adjust colour saturations, split tone, reduce noise, apply sharpening and more. 
One thing to note though is that adjustments apply to the whole image and can’t be applied selectively, so while Lightroom can do just about everything a photographer needs, if you want to be really creative you will still need an external editor like Photoshop or Photoshop Elements.
You can select the images you want based on the criteria set in the Library module.
Lightroom comes with a wide variety of presets to apply certain effects to your images (such as converting to B&W or applying a Sepia tone). In addition you can save your own presets. This is very valuable as you can adjust one image from a shoot and then apply all the changes to all of the images from that shoot, and save it for later use.
You can save changes to a virtual copy as well so that you can save your changes as one photo and then have the original as well.
If you do need the additional power of an external editor, you can move directly from Lightroom into Photoshop, Photoshop Elements or any other Image editor. The advantage of using the Adobe products mentioned is that you can work on the image in those applications, hit save and because the data is stored in a sidecar XMP file bring those changes into Lightroom.

Slideshow The slideshow module allows you to create an Adobe PDF slide show of your photos. There are some customized options that allow you to create background images, apply your identity plate, adjust the layout and more. Again you can save presets of your favorite styles.

Print. The print module allows you to create prints of your photos. There are several layouts available as presets or you can create your own custom layouts and again save your preset for later use.

Web. In this module you can create Flash based or HTML web galleries that you can publish to your own web sites. Again there is several options for customization and the ability to use presets and save presets.

Presets.
A little word about presets. Lightroom comes with a large number of presets for every module. As I indicated you can also create and save your own presets. In addition several users are creating and making presets available on the Internet that you can download and use in your software.

My Workflow with Lightroom

I shoot a large number of Digital Photos especially using 3 cameras (Canon 30D, 40D and Powershot G9). When we travel there also also images that come from the kids cameras and my video cameras. Here are a couple of ways that I use Lightroom. One is to pick, adjust and export images from a family trip to a Photo Sharing web site and the other is how I handle shooting a soccer game where I just sort and pick images for sharing online.

Importing Photos.
The start of my workflow is a little different because of the way I deal with my photos. Because I store images in a couple of places, I don’t use Lightroom to copy pictures off of my media cards, although it can. I import photos using a card reader and the Canon Media Card program. This program is set up to import my pictures to a folder created based on the date that the image was taken. Once all of my images are imported to the PC, I then copy the folders to an external drive. It is from this external drive that I import the pictures into Lightroom.

Once all of my folders are copied to an external drive, I open Lightroom. For something like a trip I create a new catalogue specifically for that trip. Likewise this year I am shooting a variety of soccer teams for my community soccer association, so I have a catalogue set up just for those images. Something that I just recently learned about Lightroom is that I can import other catalogues into a master catalogue as well.

So I have a new catalogue file and I am ready to bring the images in. In Lightroom I select the file import photos from disk option. I point the file browser to a folder that I want to import folders from. Once the folder is chosen I can choose not to import suspected duplicates. If all of the photos are from the same location and time I will add the keywords I want to use with them, If they are from a variety of subjects I will just use general keywords (like Hawaii, Trip etc). I also add my copyright information to each photo.

Once I have imported all of my folders, I go into the library mode and if I want to add specific keywords to certain folders, I use the thumbnail view and the spray can tool to add the specific keywords. Next I go into single photo view and using the arrow keys and the p key (to pick an image) I pick all of the images that I may consider exporting. Once I have gone through the folder and picked the images I set a colour flag for those images (say yellow). I then go through the images again and unpick any that I will not export using the U key. I then usually take one more pass at them. Once I have the files that I want to export I select all and change the colour flag to another colour based on where I want to export them (I have developed my own settings for example I use green for Smugmug exports).

Once I have selected my pictures I change to the develop module and filter the images that I want "picked with green colour flag" and process each one, fixing red eye, adjusting exposures, cropping etc.

Once all files are processed I use an free export plug in I have and export those photos to the site and the gallery that I want. for pictures of a soccer game that I want to export I usually use the same process but do not do any processing of the images.

In this way I can go through a large number of images quickly and export to them to the web. For example last night I went through 580 images shot at a soccer game, selected 260 that I was going to export, and exported them to Smugmug all from Lightroom. Total time for three passes to select was about an hour to an hour and fifteen minutes. The way I used to do this took a considerably longer amount of time, as I would import the images to my PC, then using Canon’s Image browser go through and select pictures writing down the ones I wanted. I would then select and copy those images to another folder. Then use a batch resize to make them smaller and then another piece of software to export them. This sometimes took me a couple of days to accomplish! It would have been even longer if I had wanted to process any of the images!

You can see the results of one of these processes by going to the following site Smugmug Kauai 2008 gallery.

The Future

Adobe has recently released the Lightroom 2.0 public beta. You can download a 30 day trial of the Beta now, and existing Lightroom, will be able to use the Beta until the end of August. The beta is installed separately from your existing Lightroom installation and both can be used at the same time.

Version 2 allows for localized correction, so you can work on a specific area of a photo. 64 bit support, better organizational tools, better print package functionality and Multiple monitor support. In addition if Adobe stays true to form, updates to the new Lightroom will continue to add new features as they did with Version 1.0. I really like the changes I have seen in Beta 2.0 and will probably have it within a fews day of it’s release sometime this summer or fall.

Conclusions

Once I started playing around with Lightroom, I started kicking myself for not looking into it earlier. Now that I use it extensively on both my PC and MAC I can’t be without it. It has peaked my interest in photography again and I am shooting more and more. My workflow has changed and I have switched my cameras to only shoot RAW images because they are so easy to post process with Lightroom. I still shoot jpg only for sports photography.

While Lightroom comes with a fairly hefty price tag and doesn’t replace Photoshop, for someone that takes a lot of pictures, especially of you shoot with a DSLR and RAW images. I feel that it is an indispensable tool!


Photo Sharing on the Web

A few years ago, I heard someone say Digital Cameras are great but they never see the pictures that people take like they did when they had prints. When I thought about this I realized that it was true.

I take a lot of digital photos myself and in the past have been publishing to my own web sites and displaying them using server software called Gallery 2. But what if you don’t have your own web site?

I use three public sites for publishing and sharing my photos now. Picasaweb, Flickr and Smugmug. Here is some info on these three Photo sharing sites

Picasaweb http://picasaweb.google.com. Picasaweb is a free Photo sharing site from Google. You can make your Albums and photos public or private. They give you 1 GB of free storage space and you have the option to buy more (1 GB equates to around 4000 pictures). You can also download Picasa photo software which allows you to organize edit and post all pictures in your collections.

One of the things I don’t like about Picasaweb however is the way albums are displayed. All of the public albums are displayed on a single page so if you have lots of albums it can take a while to load the page.

You can see my picasaweb gallery at http://picasaweb.google.com/srkennedy.

Flickr http://www.flickr.com. Flickr is a free photo sharing site brought to you by Yahoo. Flickr has gotten very popular over the last few years. They offer both free accounts and Pro accounts. Free accounts do have some limits, there is advertising, as well as a 100MB upload limit per month. You are also limited in creating collections and sets. A Pro account that has all of the limits and advertising removed costs 25.00 USD per year (well worth it in my opinion).

Again you can control who has access to your photos, add keyword tags to make your photos searchable, edit your photos online and your visitors can view the photos in a variety of photo sizes. Visitors can also add comments to your photos.

Something fairly new with Flickr is that Pro users can now also upload short videos to the site.

Flickr is a considered to be a community site. You can add your friends sites to your account and see whenever they upload new photos, as well there are thousands of groups that you can join that have photo pools where you can add your photos and discussion groups where you can ask questions related to the group and photos.

Uploading photos is easy as you can use the free Flickr uploader software or many photo editing software packages will allow you to upload directly to Flickr from the application. I have a free plug in for Adobe Lightroom 1.3 and greater that allows me to upload directly to Flickr.

One of the problems that I have run into with Flickr is that images can easily be used by others. When you upload a photo you can choose the type of license that the photo is uploaded with. This license can be private, public or using creative commons you can select different licensing terms. However there is no real way (other than making images private) that you can protect your images. I have used Flickr to find photos for my kids school projects and downloaded them (yes I only selected public images). With this shortfall Flickr is not a good choice for professional photographers.

Flickr also offers stats so you can see how many times your photos are viewed.

All in all I really like Flickr and will continue with my own Pro account for a while. If you want to see my photos please visit http://www.flickr.com/sysguy

Smugmug http://www.smugmug.com . I found Smugmug via the discussion groups on Flickr. It is a site that a lot of professional photographers use to display images for their clients as well as to sell their photographs. Smugmug does not have any free accounts but they do offer three levels of accounts, Standard, Poweruser and Pro however they do offer a two week free trial. One of the big reasons I like Smugmug is the way that they display photographs for your visitors. When you upload photos they create a flash based web gallery with thumbnails of your images and when your visitor moves through the thumbnails the selected photo appears in a larger window beside the gallery. Your visitor can also click on the photo and choose several sizes of the photo to view. As with the other sites your visitors can also view a slideshow of your photos (or you can control what and how they see).

The Standard accounts offer unlimited storage, the ability to order backup DVDs, your visitors can order prints, personalization of your galleries, the ability to hide your galleries and more. A Standard account costs 39.95 USD per year. Power Users accounts (what I have) for 59.95 USD/year, give the same features as the standard accounts, plus the ability to customize more using headers and footers, add DVD quality videos, use your own domain names and right click protect your images so they can’t be downloaded if you choose. Pro accounts (149.95 USD/year) include all of the features of the Standard and Pro Accounts as well as the ability to set your own pricing for your prints (make some money), sell digital downloads, watermark your images, create guest upload passwords and offer more protection features. If you are interested in getting a Smugmug account you can save 5.00 using my coupon code (XUgaKlvXVMo0Y), just enter this in the referred by field in the sign up. Alternatively you can add use my email address if you know it.

There are also other specials, if you are a Flickr user you can save 50% on the first year by moving your account over as well.

Smugmug gives you the ability to add keywords and captions to your photos and edit them on line. Your visitors can add comments and rate your photos as well as order prints and gifts.

Again Smugmug has all kids of tools that you can use to upload your photos and you can upload directly from several photo editing applications. I have a plug in that I use from Adobe Lightroom 1.3 to upload directly.

Privacy is very easy on Smugmug as you can create Smugislands that protect your galleries from search engines and other users stumbling across it. In addition you can password protect your galleries as well. This is one of the reasons I chose Smugmug as I have an assignment coming up that will allow me to post the images privately in an unlisted gallery (the viewers will need the exact url to see the gallery) and  I can also password protect the gallery.

Smugmug also is a community based site so you can add friends or families accounts. Your visitors can also get an RSS feed of your galleries and they can view any uploaded photos in their RSS reader.

Smugmug’s stats can show you how often an image has been viewed and in what sizes.

At first I found Smugmug a little difficult to figure out, but after playing a little bit I am getting more comfortable with it.

If you want to see what I have dome with Smugmug visit my site at http://www.sysguyphotography.com

If you are interested in becoming a Smugmugger please be sure to use my coupon code, XUgaKlvXVMo0Y to save 5.00 off your account.

Drobotized!

What? OK let me explain. Last week we got our demo Drobo unit from Data Robotics. We ordered a not for resale version via distribution and have it to review and show off to clients. Sysguy Consulting is happy to announce that we are an Authorized Drobo Partner!

So what is the Drobo? The Drobo is a USB based enclosure that protects your data. The box itself is a little smaller than a shoe box and it has spaces for 4 Sata Hard Drives. You simply install a couple of hard drives, power up the unit and connect it to your computer. After being formatted the drive spans your data across the hard drives that are installed in the unit, protecting it by basically making copies of the data to both drives. This might sound like a standard Raid 5 configuration but it is not as there are some key differences.

With a Raid 5 set up you need a minimum of 3 hard drives, all of equal size (or the only the size of the smallest drive will be used on all drives). With the Drobo you can start with as few as 2 hard drives of any size (not necessarily matched) and both sizes will be used to the fullest. Also with a Raid 5 device expanding the size of the array means that you have to remove any data, add the additional hard drive (again same size as the others) and then rebuild the array. With the Drobo it is simply a matter of popping in an additional drive of any size and it automatically gets added to the storage pool! OK what if there are 4 drives in the Drobo and I want to increase the size? Again no big deal. Pop out one drive, replace it with a new larger one and the size increases.

The data is protected by Data Robotics Raid 5 like proprietary system so redundancy is spread across all of the drives. You do lose some of the space on the drives but this ensures that your data is protected. There are 4 drive lights on the Drobo. Each one indicates green if the hard drive status is fine. If you start running out of space and have empty bays the indicator light will turn yellow on the Drobo indicating to add a drive there soon. If the drive fills the indicator light will turn red in the empty bay indicating to add a drive right away. If the light is flashing red it means that the indicated drive has failed and should be replaced ASAP. Simply replace the bad drive with another of equal or greater size and the unit will automatically add the new drive to the system. It makes Data Protection simple for any user!

Out of Box Experience

As indicated we picked up our demo unit last week. As well we also picked up 4 Seagate Sata 500 GB drives for the unit. Set up was simple. Unbox the Drobo, remove the magnetic front plate, unpackage the hard drives and slide one in to each bay. I downloaded the latest version of the Drobo Dashboard Software  from the Drobo support site site, installed it on my Vista Ultimate laptop, plugged in the Drobo via USB and the device was recognized. To this point it took about 5 minutes.

The dashboard software popped up and asked how we wished to format the unit. This is where you have to think a bit (although it is easy). You have the option if formatting as NTFS or Fat32. If you will be connecting the Drobo to an XP PC or a Vista PC select NTFS. If you will be connecting the unit to Windows 9X systems, XP or Vista systems and Macs select FAT32 (although there are some restrictions such as file sizes with Fat 32). In less than 5 minutes the unit was formatted and ready to go.

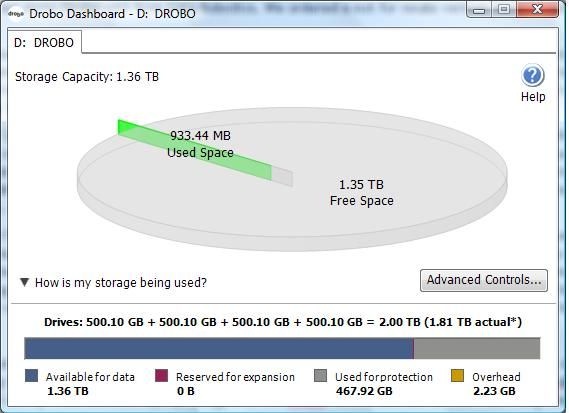
Vista sees the drive as 2 Terabytes of storage, however the Drobo Dashboard indicates that there is only 1.35 Terabytes available as some of the space is being used for data protection. Below is a screen shot from the dashboard software.

drobo5

Performance wise, reading and writing to the Drobo seems no slower than writing to any external USB drive.

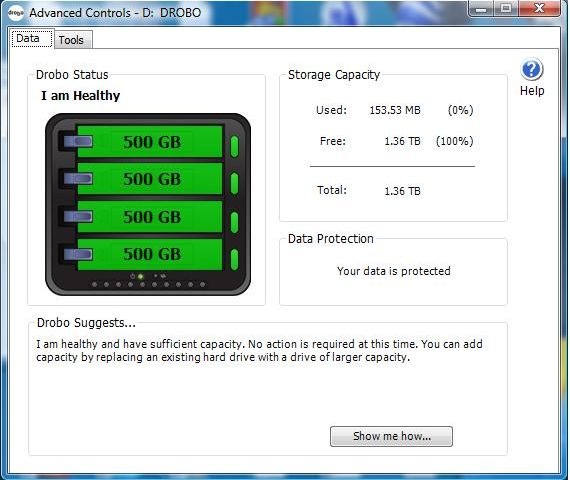
I decided to go through the process of simulating a drive failure to see what would happen. Here is a screen shot of the drive status before the test.

drobo1
 

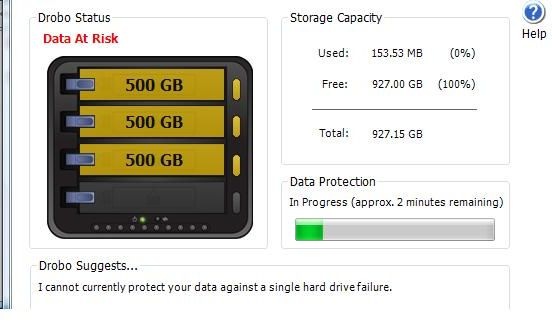
Next I removed the magnetic front plate and popped a drive out. There is a brief time while the data protection is partially unavailable as the unit reconfigures itself as indicated in the screen shot below. It only for about 2 or 3 minutes but there was nothing on the unit yet either.

drobo2 

After the 2 or 3 minutes the dashboard changed to this screen and data protection was again available.

drobo3

Getting the unit back to it’s original status was as easy as pushing the drive back in. Something to note is that the unit was powered on the whole time that I was doing this. I did not have to turn it off or disconnect it at all from the laptop.

Uses

As a serious amateur photographer and a small business owner I plan on using the Drobo to back up and store my digital photographs on it as well as my Adobe Lightroom catalogue files.  I also will use it to backup some of my various machines. The Drobo works well with folder sync utilities such as the Microsoft Sync Toy or Allways sync. In addition you can use it with Windows backup or drive imaging software such as Runtime Software Drive Image XML. If formatted with Fat32 it also works with OSX Leopard’s Time Machine backup. You can connect it to a server or PC and share folders on it directly (if attached to a domain server you can add NTFS security to the shares) or use something like Microsoft Foldershare (foldershare.com) to access it on your network or across the Internet.

One of the knocks I had against the Drobo when it was first released was that it was a local only device (connected to one PC). Data Robotics sort of answered some of my concerns in January when the released the DroboShare product. The DroboShare is a small box that connects to your network and has 2 USB ports on the back so that you can plug in up to 2 Drobo units to share on the network. The DroboShare retails for 225.00. While this allows you to share your Drobo on a home network, there is a performance hit because the Drobo still operates as a USB device and this causes the unit to be even slower than hooking it up to a PC and sharing it out. As well there is no active directory integration or DFS support so it would not function well as a Network Attached Storage device in a large domain environment.

I plan in in the near future hooking the Drobo up to a Windows Home Server to see if it will work with that.

Comparing Drobo to the Dlink DNS-323

While there are some differences in the devices I would like to compare the device to my DNS-323 from D-link. The DNS-323 is a Network Attached box about 1/3 the size of the Drobo with space for 2 SATA hard drives and a 1 GB Ethernet port as well as a USB Print server port. The DNS-323 can be set up with 2 drives as two individual drives, two mirrored drives, both drives (can be different sizes) configured as 1 Hard Drive or a striped raid (requires identical hard drives where data is written to both drives functioning as 1). Cost for the enclosure is also cheaper than the Drobo.

Once you have chosen what type of drive you want to set up with the DNS-323 any changes to the configuration require removing data re-configuring and reformatting the drives. In fact D-Link warns that even to upgrade the firmware you should back up the unit in case the firmware update reformats the drives. this is not the case with the Drobo as mentioned above.

Across the network though the performance is better for writing and reading files on the D-Link product than a shared PC attached Drobo or a network shared Drobo. The D-Link also offers many other features built in.

The DNS-323 has it’s own security software built in (it’s basically a Linux file server) so folder level control can be assigned on the unit itself. In addition it features an FTP server (for Internet Access to your files), a UPnP media server (stream media content on your home network), an iTunes server (share music via iTunes). Recent firmware (May 08) has added BitTorrent support so the device can download torrents and some other enhancements.

I have been using a DNS-323 for almost a year now and have been very happy with it. It has allowed moving files between systems easy and with it’s built in security it is an ideal product for a small office that may not want a full file server. However it does not offer the same protection and expandability that the Drobo does.

There are several other NAS RAID 5 devices available on the market. While these should perform better they also suffer from the standard RAID 5 limitations for upgrading and scalability.

Drobo Wishes

There are a few things that I really hope to see in upcoming Drobo releases.
I would like to see Firewire 400 or 800 added to the Drobo unit and the DroboShare unit. This would address some of the network performance issues and would make this a killer product when connected locally to a PC or Mac.

Alternatively I would like to see a NAS Drobo unit with GB Ethernet built in. Again I would be very happy with this configuration and it would make it an ideal product for small businesses. Make it Active Directory and DFS aware and nothing could touch it!

I have tried to find out what may be in store for the Drobo, however Data Robotics will not talk about future product releases.

Is it for me?

If you have read any of my backup posts on this blog, you will have seen that I am a very strong proponent of making sure your data is backed up somehow both locally and offsite. While the Drobo doesn’t handle offsite backups, it can be a valuable product if you use it to store your critical data (pictures, accounting data etc) on it. Professional Photographers have flocked to the Drobo and swear by it. As someone who has been backing up to external USB hard drives for years I must have close to 15 of them in various sizes and all full of data. With the Drobo I can use one unit and just add a larger hard drive as needed instead of buying a new USB enclosure. My old enclosures will be re-tasked with storing data that I want to back up offsite.

While the Drobo is not the least expensive option for backups it is one of the safest. The Drobo unit itself retails for 499.00 and the cost of the hard drives will vary depending on configuration. For my Drobo I picked up 4 500 GB Sata drives at a local retail store for 84.00 each. Compare this with the cost of your memories if your system hard drive fails and all of your photos and personal information is lost.

Conclusion

I am very impressed with the Drobo unit to date. I have solved some of the sharing problems on my home network by using Microsoft’s Foldershare and the performance on small file transfers across the network has been fine. While it may appear to be a little pricey to begin, the expandability and flexibility of the unit make it worth the cost, especially if you have sensitive data to protect.

You can learn more about the Drobo by visiting http://www.drobo.com. You can actually check out the Drobulator that will show you available storage space with a variety of different drives. Or if you wish to see the unit hands on, we would be glad to arrange a Live Demo for you.

Interested in purchasing? Call or email us and we can help!